3.08.2012

My New Linen Closet


My house all 3200 sq ft of it; doesn't have a linen closet! We've been living with inadequate storage for too long. I finally couldn't take it anymore and I called my contractor!


I can't believe we were trying to store linens for 6 people in these two cabinets. Bad design builders! The upper cabinet was too shallow (the doors wouldn't close all the way because the towels didn't fit right in 12" of space). And the bottom cabinet was too deep I'd lose all my pillowcases and could never find anything in that dark hole. Not to mention one of my biggest pet peeve wasted space! Look at that lovely counter with nothing on it. In real life it was always full of misplaced junk (pet peeve number 1 – clutter).


So in came the cavalry…


They removed the cabinets, demoed the soffit, framed up a new wall and door. Then the fun stuff: adding shelving 14" deep. And the nice part of building your own closet it you get to do it your way. So the top shelf (the one that is above where the builder usually stops we added a 12" shelf for easy access (perfect for storing pillows). And the bottom shelf was placed at the exact height of my upstairs vacuum – love it. Then the best part was an idea I got from a friend – vertical dividers! No more towels and sheets falling over on top of each other!


I finished off the closet with leftover white paint from the garage, baskets and labels to organize, and peel and stick vinyl faux wood flooring to fill in the missing carpet from where the cabinet once stood. Eventually we'll redo all the floors in our house but I thought this was an inexpensive solution for now.


During construction my contractor asked me if I'd like a can light over the door – sure why not! So glad we did I love it! We ended up removing a wall sconce to make the rewiring more affordable. I never liked that wall sconce anyways it was right above our A/C termostat and if I left the light on it would heat up the termostat and my A/C would never turn off. Another builder blunder. But I love it now.


My finished closet!


1.04.2012


My New Living Room Progress:


I knew I needed a new Living Room when this became a regular scene..forts made out of blankets and sofa cushions.

Here's a look at my room before:

Dining Room - really used for homework and crafts.


Living Room

btw that is the color that came with the house I haven't changed it yet.

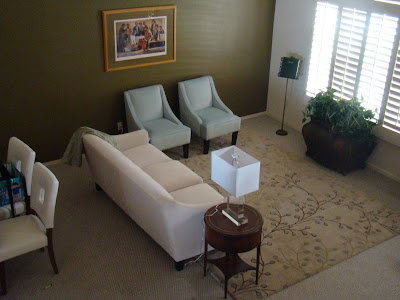
I wanted a new sofa to start it off; something stylish without sofa cushions.

I found this one at Macys it's called the chloe I actually went to buy the claudia - it's the same sofa but in leather, white leather! But after thinking about it, white velvet seems so much more comfortable and cozy.
I found my rug at overstock, the same one can be purchased at ballards for 3 times as much. 100% wool room sized rug. With a traditional floral theme but much more casual feel. And so it was, the new color scheme for me room ivory almost monochromatic with touches of blue.


Next I decided I needed two blue chairs - not the matching set from the choloe line at macys, they were much too bold and greenish. I wanted something subtle. I purchased a few again from overstock (I had a coupon for 15% off), those chairs were a let down- rough and too grey for my new light and bright room. After returning those chairs (UPS loved me), I discovered a new site and found chairs I was sure to love - well I loved the price anyways!


Here's my new rug, sofa, and the chairs I just pulled out of the box..


1st Layout: seems distant, too serious.


2nd Layout: Something is Missing


3rd Layout: Much Better


And a highlight on my retro buffet that divides the space and provides great storage for crayons and paper! A great craigslist find from my dear trash


8.27.2011

You may think I'm gone for good, but really I've been dealing with this:


I was remodeling my home - and other things.


I'm excited to get my pictures organized and show everyone what I did!

12.21.2010

Teacher's Christmas Gifts 2010


So it's no surprise my go to gift is personalized note cards. This year I found some great premade color coordinating note cards by my minds eye . 50 double-sided cards, 10 designs 5 cards per design. So my mind's eye says "Hey If I use one of each design, I can get 5 sets; or 5 gifts per box I buy. I look at the price ($6.99 at Ross), Hmm..$1.40 a gift not too shabby!
Of course I added each teacher's name in silver hot foil. Mostly I just added the first name but the above example I played with adding a last name in a different type. I added ribbon and a salt dough ornament and there you have it a cute gift that says I put some thought into your gift!
Cost: $1.45
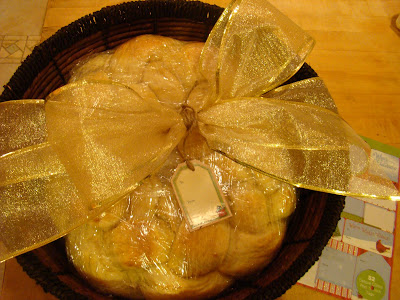
For the next teacher I made sweet braided bread.


I braided the bread in four strands and then connected the ends to form a wreath. I didn't realize how heavy it would be so I ran out a bought a basket at Home Goods wrapped it up in plastic wrap and added a bow and tag. (The ribbon I purchased after Christmas last year for $2.00 a spool). That turned my free gift (or cost of ingredients) into a cost of basket gift and a touch of ribbon.
Cost $13.25

Then we had the picky teacher..so I used a gift card I received a year or two ago to buy one of those collectible Hallmark ornaments that fits this teacher's personality. This one was much easier to carry to school.

Cost pretty much Free


5.25.2010

Food Storage Space

I always look for storage space in potential homes - I'm not blessed to live where basements are common. When we purchased this home I had another spot picked out for our food storage needs - but as our house changed I realized we'd need a new place for our food storage.

We have this little door in our laundry room, our Realtor called it "Harry Potter's Room" - of course it's under the stairs. We used it first as a "Clubhouse" we had it set up for school complete with whiteboard etc.

I knew it would make a great food storage closet I just needed to remove the carpet (in case of spills) and add the shelves....

This is my favorite little nook next to the door...I can fit 34 cans of spaghetti sauce neatly, out of sight, yet accessible. I love custom shelves - you should've seen the look on my handy man's face when I had him measure a can so they would fit perfectly.


My next favorite spot is my tricky entry corner - I wanted every inch usable. So I came up with this solution to the otherwise dead space, corner shelves!


The main, larger shelves here..you can see the angle of the stairs above, perfect for storing extra condiments. And the cereal box shelf - those boxes are two deep so whatever the front box, their is a matching box behind. I always stock up when cereal goes on sale - now I have a place to store them.


These beauties I found at Costco; I guess they're for dog food, but they said food safe on them. So again I made sure the shelves fit perfectly around them to store my bulk dry goods. I love gamma type lids that screw on and off with ease (they also came with a scoop).


I love my little but customized food storage closet.


Oh and the floor..I removed the carpet and tack strip but didn't want to hassle with adding tile to the closet and I didn't like the bare concrete so I made a little trip to the Home Improvement Store and came home with peel and stick vinyl tile. But instead of the traditional square tiles these were made to look like wood floor and were 5 inches by 36 inches. Cut them with scissors and stick them to the concrete. The floor cost me a whole $17 - they were on clearance of course.


5.21.2010

A New Drawer

Problem: Random lunch snacks 'floating' around my pantry.
Solution: A Snack box to hold them in one spot.

I started with this Costco size Cookie Box..

Cut the top off and spary painted four sides...


While it dried..I cut strips of left over cardboard, marked and measured for handles..


I used my big bite to punch perfect holes...


Used those as a template to mark box...


Punched holes in box...


Pushed screws through...


Attached handle using the cardboard previously made as filler...


Here's my drawer...


And my random lunch snacks inside...


It fits perfect in my pantry....


5.18.2010

Birth Announcements

I had a gal contact me wanting birth announcements, she explained what she wanted and I thought how classy!
She ordered a stack of Ecru Deckle Edge Note cards and had me hot foil her babies name, date, etc (I've blocked it out to protect her privacy) but they turned out so cute!
She's going to adhere a photo to the front and then the 'stats' are inside. I also added her return address to the envelopes, her recipients are going to think she spend a fortune on these unique baby announcements.

I added these personalized Thank You cards as a bonus.